 Ok the
beginning.....
Ok the
beginning.....
Start a game with the map you want to waypoint.
And make sure there are no bots running around.
(I'll be telling you how I like to waypoint, This is not the "only
way" )
It's not an easy job and it takes lot of time so be patient and
keep testing.
Bring down the console by pressing the ~ key.
type: pathwaypoint on
*KeyBinds Section* (you only need to do this once)
type: bind w "waypoint add"
type: bind s "waypoint delete"
type: bind o "pathwaypoint create1"
type: bind p "pathwaypoint create2"
type: bind k "pathwaypoint remove1"
type: bind l "pathwaypoint remove2"
type: bind [ "waypoint tag"
type: bind ] "waypoint menu"
type: bind = "shrikebot menu"
type: bind i "waypoint info"
type: bind g "waypoint save"
type: bind h "waypoint load"
Save your waypoints in the console.
Type: Waypoint save
Save the waypoint after you have done a small section of the map;
(lets say a ladder or after you tidied up a small section.)
you can also bind a key to "waypoint save"
*BEGINNING WAYPOINTING*
This section describes the basics of
waypointing.This will get the bots up and moving in a basic manner.
Now walk all over the map leaving behind waypoint poles in a red or
green color. (depends which team your on). The best way to place the
waypoints is by pressing "w" while you walk, but you can also turn
on auto waypointing which will place waypoints automatically every
200 units. (type: autowaypoint on)
Ok a few things to keep in mind when laying out the waypoints over
the whole map.
* Place the wpts not too close to the walls.
* place the wpts not too close to each other.
* place the wpts on each side of the door way.
* Turn off autowaypointing when it's not desirable.
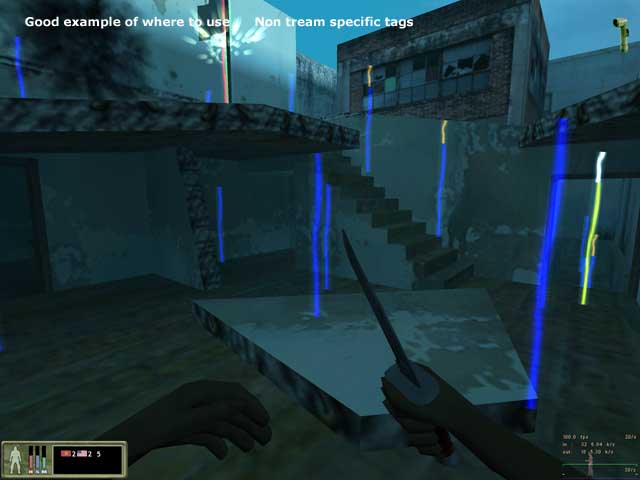
* Turn off autoteam when you want to use NON team specific
waypoints.
* Turn off autopath when you don't want paths to your waypoints.
(have to add them manually)
When autowaypointing is off you can place waypoints by pressing the
"W" and remove them with the "S". (only
waypoints for your own team if autoteam is turned ON)
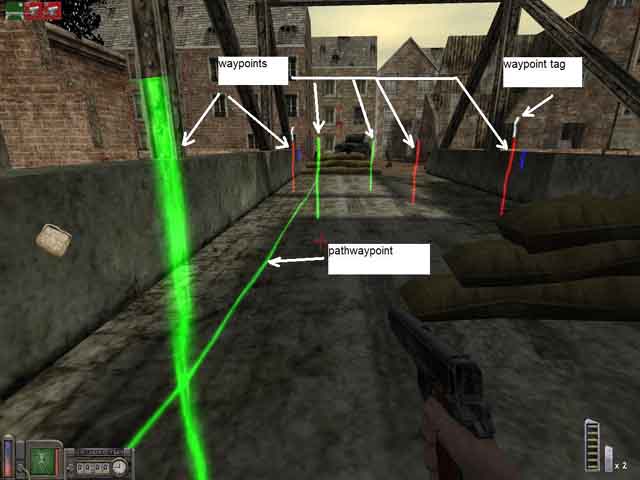
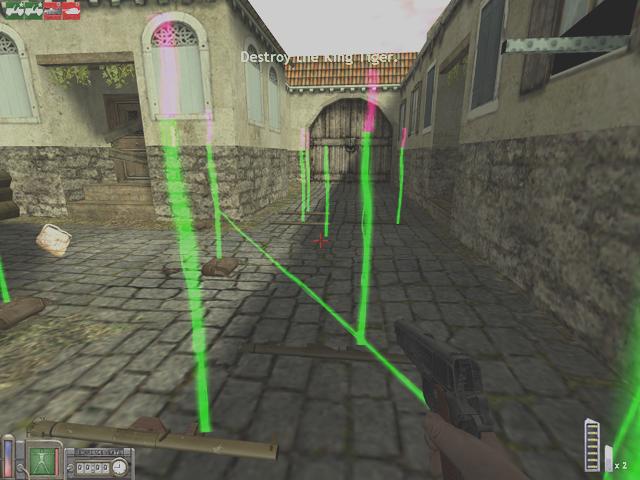
Between the waypoints you see horizontal lines (looking just like
the wpts). these lines indicate if the bot will consider that
path valid. you can add or remove the pathwaypoints by using the
"O", "P", "K", "L", keys. (as described in the key binds section).
Use path create1 at one waypoint and use create2 at an other
waypoint, a path will then be created.
Use path remove1 at one waypoint and use remove2 at an other
waypoint, a path will then be removed.
(Waypoint tags or flags can be added using the waypoint menu
which is under the " [ " key.)
Im going to list all wpt tags with a brief
discription.Pics will be added if the tag is difficult or requires some
special techniques.
* Pathwaypoints*
The pathwaypoints are the bots sense of navigation. They are the
most important wpt. And need to be placed with great care. When you
place 4 waypoints close together you'll see pathwaypoints between
all of the waypoints. this is a mess. you need to remove the
pathwaypoints where you don't want the bot's to move. You can remove
a pathwaypoint by pressing the "K" at one waypoint and "L" at the
other waypoint where you want the pathwaypoint to be removed. now ya
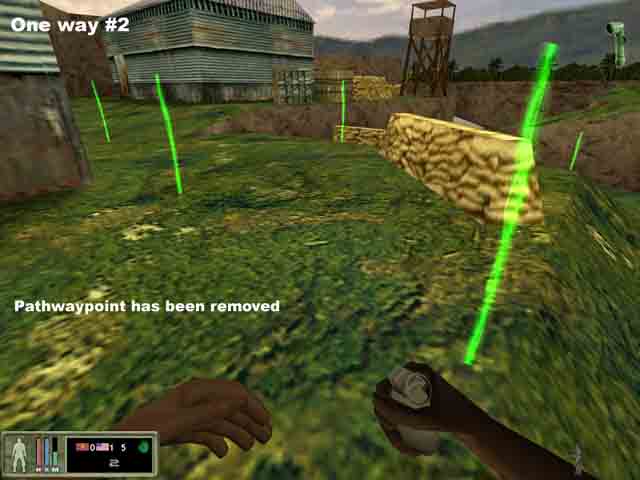
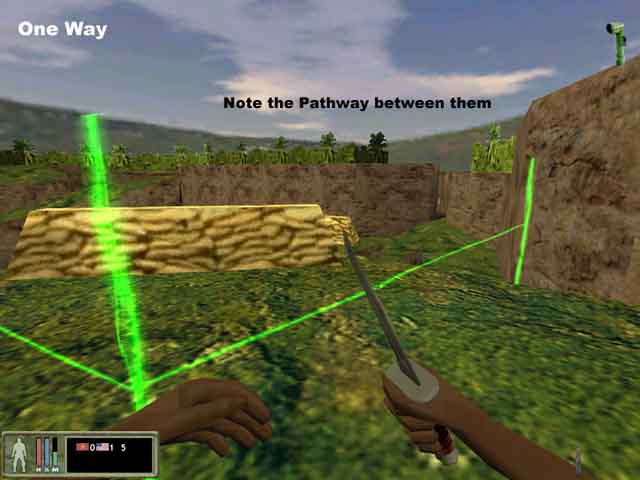
got to do it vice versa. You can make a "one way" pathwaypoint by
removing only the pathwaypoint in the direction you want.
You might want to make a "one way" pathwaypoint if you see the bots
going the wrong way in a map. You only need to remove "one"
pathwaypoint in the direction you don't want to bot to go. (lets
say a bot runs trough a street and half way he turns around. Then
remove the pathwaypoint in the beginning of the street in the
direction of the bots wrong direction.)
"One way" Pathwaypoint Examples:
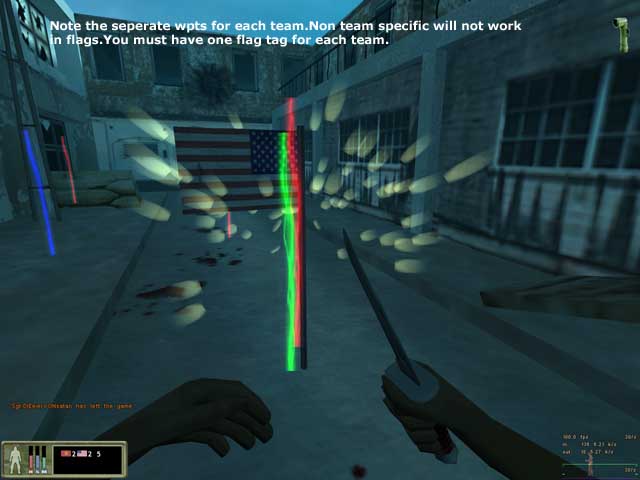
*FLAG LOCATION*
Place these whre there is a flag.These
are team specific so one for each team will have to be placed.In cf
maps these are bots main goal.The flag tag will be added
automatically.
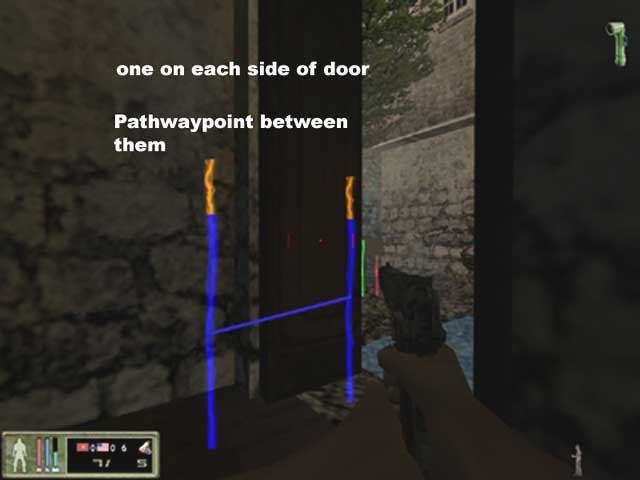
*Door Waypoints
*
Doors are easy just place a waypoint at each side of the door way
and apply the door tag.
This wpt. tag will cause the bot to pause for a second allowing the
door to open.
DOOR example.
*JUMP*
Place a normal wpt just before the object you
want the bot to jump over or on to,place a "jump" tag on it.Move to the top of object and place another
wpt .Add a bot and test these,it
might require some minor tweeking depending on the object.
*AMMO*
Ammo tags are automatically added
when standing close to ammo crate.
*PRONE*
Add a regular wpt then face the
direction you want bot to face and add a "Prone" tag to
it..These are especially good for defensive posistions.(NOTE:BOT
WILL NOT MOVE WHILE AT THIS TAG)
*Crouch Waypoint*
Waypoints are turned automatically into crouch waypoints when placed
if you are crouching.
Bot will ignore any tags or flags at the crouch waypoint.
No examples will be given, use them as normal waypoints but then
crouching.
*TESTING*
And now for the testing.Start with
adding one bot and let him run around and follow him or use
spectator mode.(You can type in "observer 1" in console
and bots wont see you."observer 0" to turn it off) If all
goes well add more.Add as many bots as your system can handle.Look
for spots where bots get stuck or have a hard time,edit wpts to
fix.Check to make sure bots cap al flags and use ladders well.
Be patient,waypointing is a time
consuming job but is very rewarding.The key is practice and testing.
*INTERMEDIATE WAYPOINTING*
Now that you have got the bots moving in a basic
manner its time to get them to start doing more advanced things.
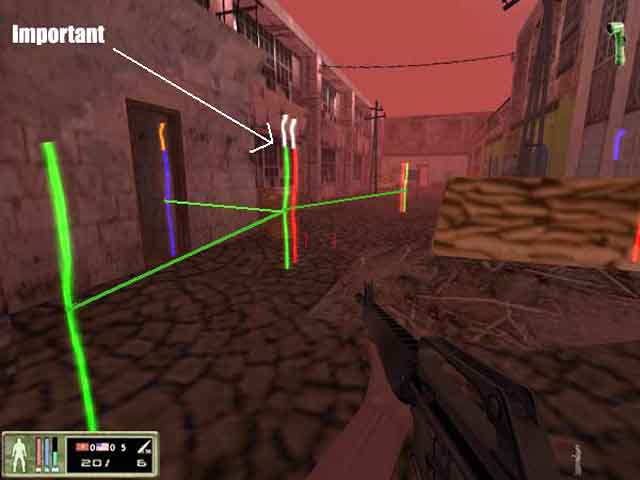
*Important*
Importants are used
where a bot has a choice of different routes to take. Don’t use too
many too close together or bot will get confused. Bots consider
importants a secondary goal so if there is someplace you want the
bot to go place a important there.
Do not use Important on Non Team
Specific wpts (blue)
Important tag examples.
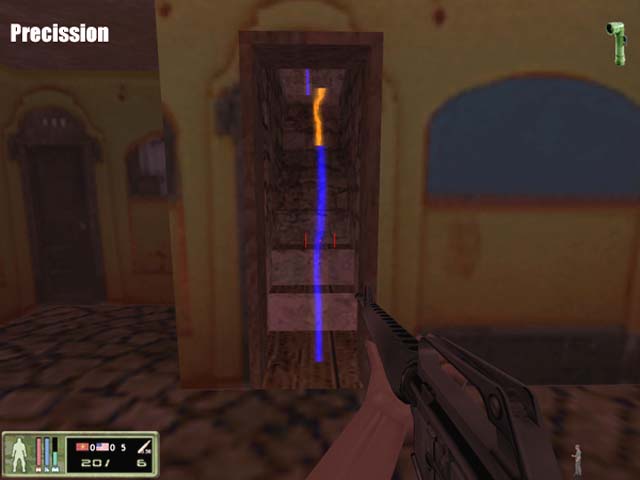
*Precision*
Bots will
slow down and go exactly to this wpt. Place these in buildings or
small doors and areas where bot might have trouble getting through.
Precision example.
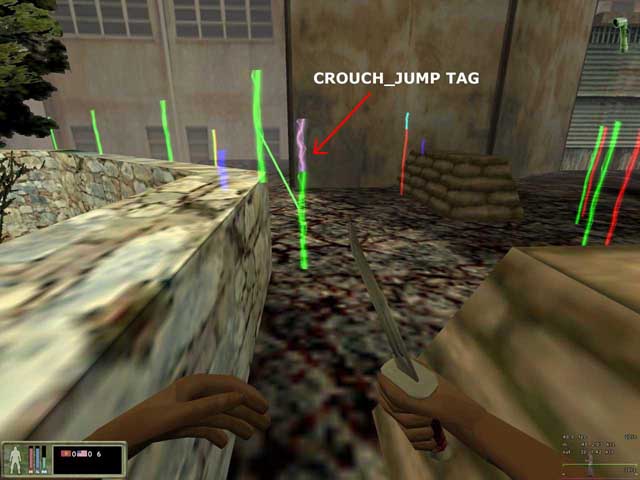
*Crouch Jump*
1. place normal waypoint
just before object.Add "crouch-jump tag (mind the direction).
2. place another waypoint just on top. (almost on edge).
4. bot should now crouch jump.
Crouch Jump example.
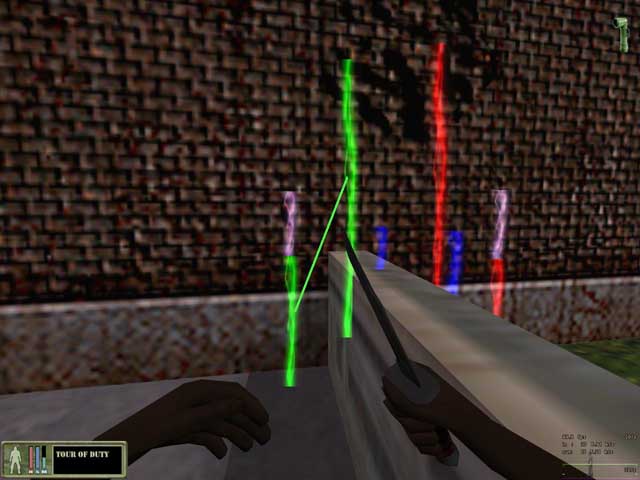
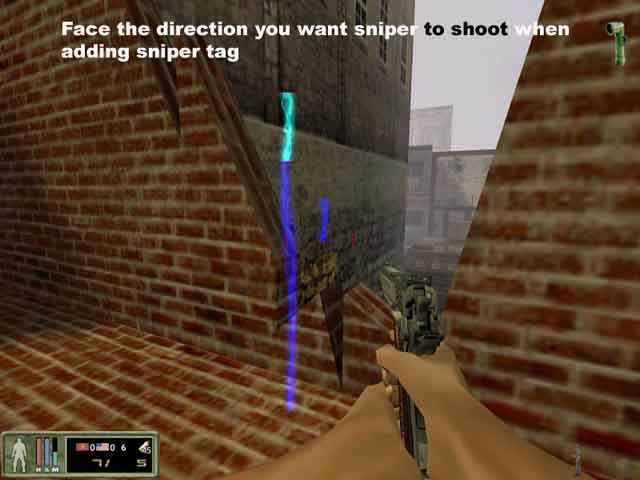
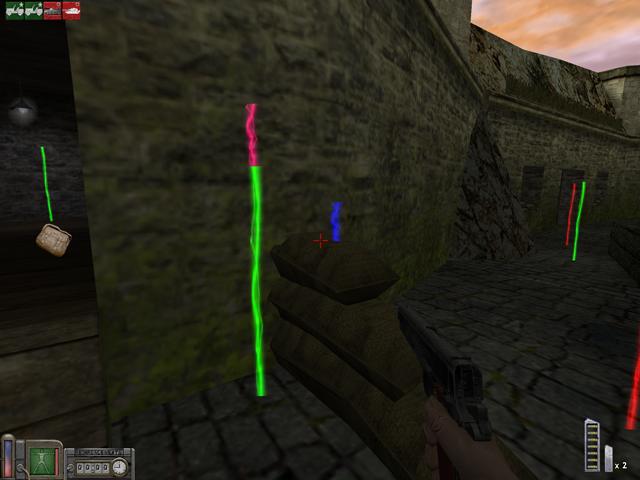
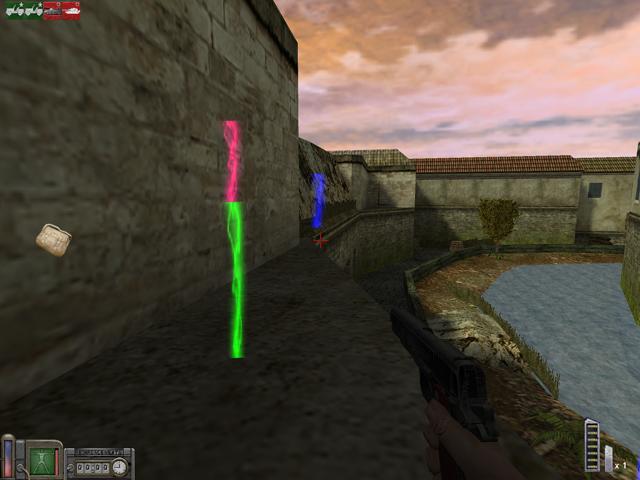
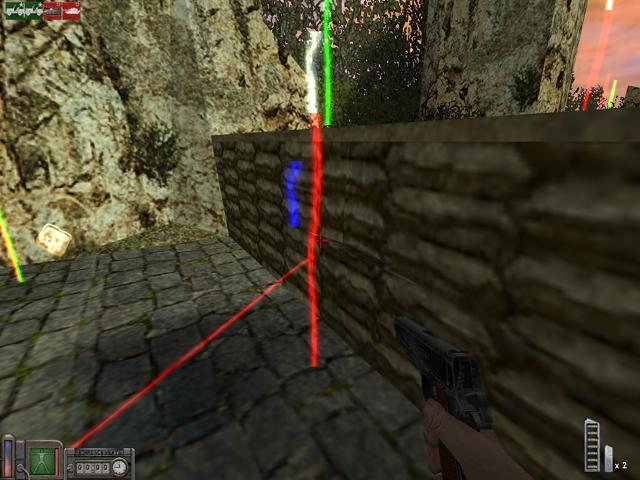
* Sniper Waypoints*
Sniper waypoints are some what the same.
Place waypoint at a suitable location and apply the tag, apply it
when facing the target.
A small blue pointer will be placed in the direction you were
looking.
Don’t place too many sniper spots close to each other. As the bot
will choose the first blue pointer it sees. It could be pointer from
a waypoint that’s close by leaving the bot looking the wrong way.
(easy target for enemies).
The sniper waypoints are placed at strategic points. Where the bot
has clear view and it has a some what covered place. Use the sniper
waypoints in windows, behind crates, in a dark spot, on a roof, or
beside a corner. As long the bot can see far. (close range is no
good for snipers as they are sitting ducks for nearby enemies)Also
prone sniper spots are a excellent way to hide.Just add sniper tag
and then prone tag.
Sniper Examples.
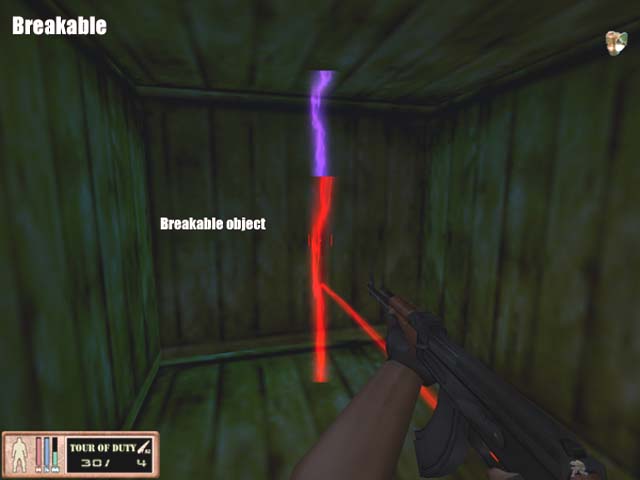
*Breakable*
Just walk up to object and place
a wpt and add "breakable" tag while facing it. Bot will shoot at object. This
only works on objects which can be broken out i.e.: windows, crates, fuel
drums.
Breakable example.
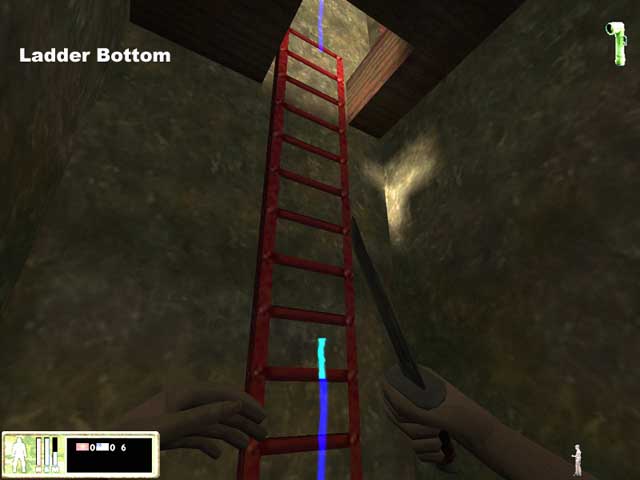
*Ladder Waypoints*
Ladders are more challenging.
Go stand against the the bottom of the ladder then place a waypoint.
The waypoint will be automatically turned into a ladder waypoint.
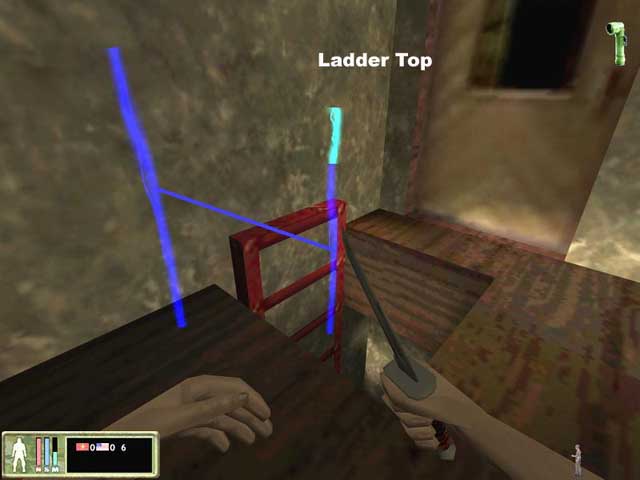
Climb up to the top of the ladder so that you can just look over the
edge then place a waypoint. Now go back down and connect the bottom
ladder waypoint with the one at the top. Using the pathwaypoint
create keys "o" and "p". use "o" at the bottom and "p" at the top
and vice versa.
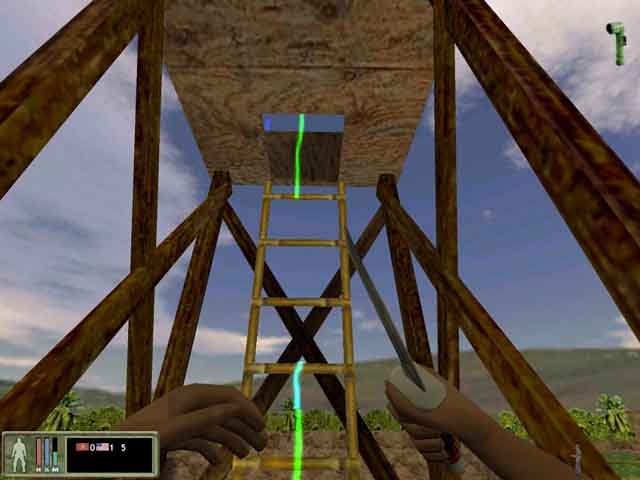
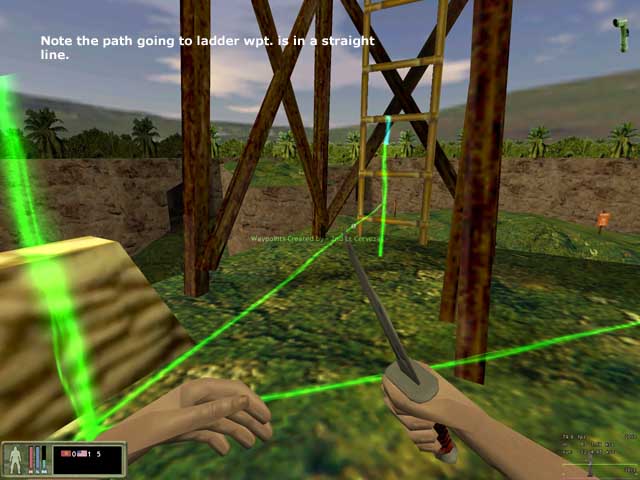
Ladder waypoints need to be extremely tidy. (look in the examples)
The paths leading to the ladder wpt
must be as straight as possible.If path is angled bot
might have a hard time with ladder.
Ladder waypoint examples.
*NON TEAM SPECIFIC*
These waypoints are useful in small
confined spaces like buildings .Both teams will follow these.
*Prone Waypoint*
Prone waypoints are somewhat like sniper waypoints. Place waypoint
then add the "Prone" tag to it. Prone tags "ARE NOT" added
automatically. Place prone waypoints at strategic locations, and not
to close to each other. You don't want the bots getting up then
right back down again. You can add a "sniper" tag to a "prone" tag
for added cover. Just remember when adding "sniper" tags to be
facing the direction you want the bot to shoot.
*ADVANCED WAYPOINTING*
Now that you have got a real good grip on
waypointing its time to start using some of the trickier techniques.
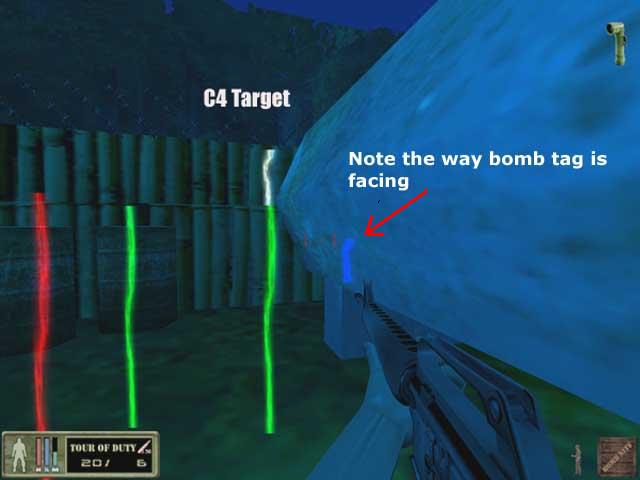
*C4 target*
Walk up to object
you want to blow up and face it, then place a C4 tag on it. Bot will
throw C4 towards target.
Bots will consider this a goal.
C4 target example.
*Flag Goal*
This is the point which
you want bot to take flag after he gets it in a cf map, usually same
spot as your flag is at. In cf maps you place the flag location at
the enemies flag and flag goal where your flag is.
For Day Of Defeat maps this is
where you want bot to return the doccuments.
*King Hill*
These will be used in kh maps.Place these around the area you want
to defend. Bots will go there and defend aginsed enemy and never
leave. The longer you’re in the kh area the more points you score
for your team.Bot will defend these point till death.
*C4 BOMB OR WEAPON*
Place this tag where you want bot
to pick c4 or a weapon.
*CAMP SPOT*
This is a excellent tag to use if you want bots to move up in a
squad. Bots will wait at this spot until. Bot tries to camp here. only under certain conditions.
when more as 2 bots camp at the spot they all leave.
You could use this tag as camp and meet up waypoint where bot wait for each other and move on as a squad.
*RADIUS*
Radius are a important tool in bot navigation. They allow bots
freedom in movement. If a radius is small in a open area bot will
make sharp turns. But if they are to large in small area bots will
either fall off ledges or bump into doorways.
Play with radius to get bot to move as smooth as possible. In most
cases the "radius rebuild" command will do just fine.
The waypoint radius is automatically set according to the type/area
of waypoint. Use the "Radius Rebuild" command before
testing your waypoints. This will resize your radius to the largest
size possible without running into nearby objects. It will not
rebuild any manually set radius.
To view radius make sure you have waypoints turned on then either
bring up console and type "radius on" without quotes or
use the waypoint menu. "radius off" turns them off.
*WAYPOINT INPORTANT COMMANDS*
There are three important
commands to use while waypointing. These are very useful tools to help you
find errors.You can either use the console or menus, which ever works best for
you.
REBUILD PATHS....Rebuilds all paths and saves them to nav1 and
2 folders with error checking.
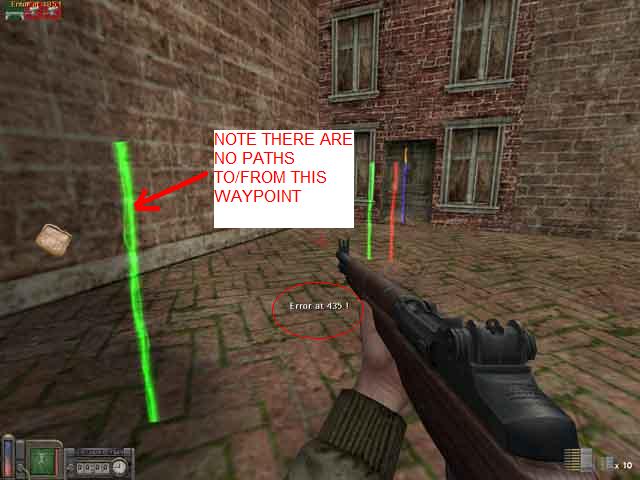
CHECK PATHS....Checks waypoints for paths.
If there is a waypoint with no pathways to/from it then a error message will
come up on screen. Use the "findwaypoint #" command to locate it.
After you get to the waypoint then you can manually add paths to it.
SHRIKEBOT REBUILD....Deletes then Rebuilds the navigation files that are located
in the "/tod/shrikebot/nav" folder. and checks paths for distance returns error number if path is to long.It
also checks if there is paths to self (two paths going between waypoints in
same direction) Bring up console to view results.
If you get the error message "path to self at #"
the you have to go back to that waypoint and remove any multi paths. I usually
find it easier to just delete waypoint and redo it.
If you get error message "waypoint path distance >
400.0 at from 11 to 435" it means the distance between waypoint numbers
11 and 435 is to great and bot will not follow it. Just delete path and add
waypoint between the two and add paths.
*COLORS*
NVA Waypoints/Pathwaypoints are red.
USMC Waypoints/Pathwaypoints are green.
Non team specific Waypoints/Pathwaypoints are blue.
The tag highest in list will be color displayed.
|
Team specific tags
can be: |
| |
|
| Flag |
(fx)
tag |
| C4
target |
white tag |
| Flag
goal |
white tag |
|
KingHill |
white tag |
|
Important |
white tag |
| C4
bomb/Weapon |
gold
tag |
| Ammo
Crate |
cyan tag |
|
Ladder |
light blue tag |
| Door |
orange tag |
|
Precision |
orange tag |
|
breakable |
cyan
tag |
| Jump |
cyan
tag |
| Rocket Point |
white
tag |
| Add Object To Rocket |
Pink Wpt
tag |
| Mg Point |
cyan
tag |
| |
| USMC |
green wpt |
| NVA |
red
wpt |
|
|
Non team tags can
be: |
| |
|
| Ammo
Crate |
cyan tag |
|
Ladder |
light blue tag |
| Door |
orange tag |
|
Precision |
orange tag |
|
breakable |
cyan
tag |
| Jump |
cyan
tag |
| |
| Non
team |
blue
wpt |
|
All tag info can be
viewed with "waypoint info" command
*DAY OF DEFEAT SPECIFIC*
The following section is for Day of Defeat mod only. All other
waypointing is done basically the same.
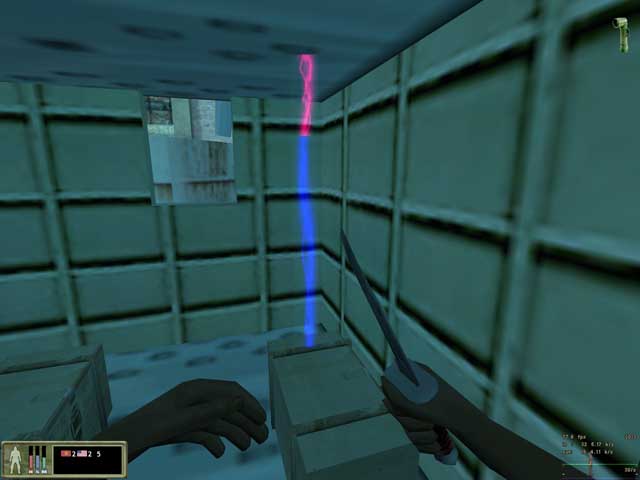
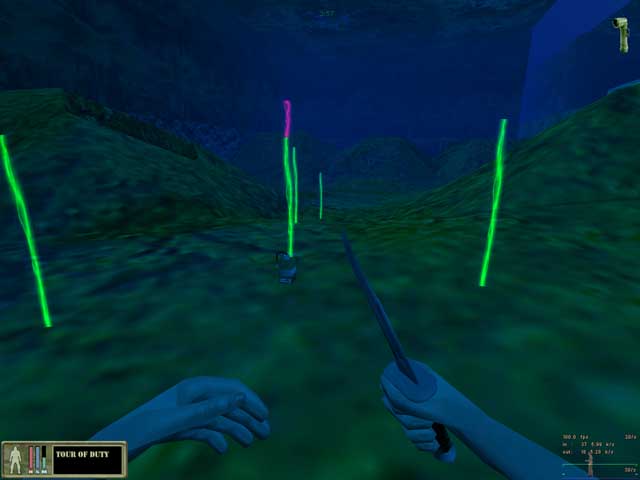
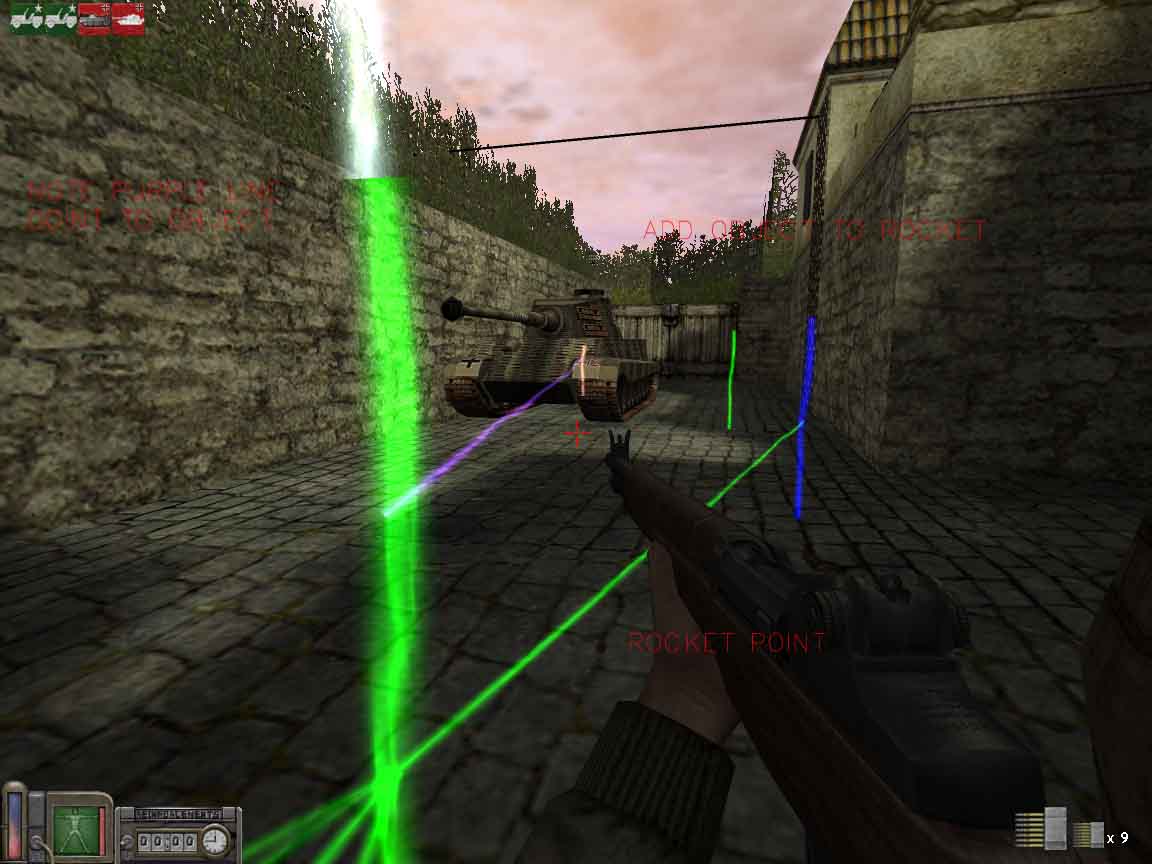
*ROCKET WAYPOINTS*
Place a waypoint at a safe distance
from target (wall,vehicle). Then walk up to object to be blown up and
place another waypoint. Go back to first waypoint and add a
"ROCKET POINT" tag to it.(Waypoint Tag Menu:2nd menu in,#3
) Next go back to waypoint at
the object and add a "ADD OBJECT TO ROCKET" tag to it.(Waypoint Tag
Menu:2nd menu in,#4 )You will notice the waypoint at the target is replaced
with a small pink waypoint.
If you go back to the first
waypoint and face the target and you see a purple line going to
target you have done it right.
After the target is blown bots will
use the "ROCKET POINT" as a regular waypoint.
*MACHINE GUNNERS*
Mg's are a little different than in Tour Of Duty because
they can deploy. You can place a "MG POINT"
tag in the standing position anywhere the game lets you deploy(sandbags).
 Prone
"MG POINT" tags can be placed anywhere else.YOU NEED TO BE
CROUCHED when adding the mg tag or else the little blue aim tag is to high
for bot to see.The following is the procedure for making prone mg tags. Crouch
while adding a regular tag then while still crouched add "MG POINT"
tag followed by a prone tag.Once again face the direction you want the mg
gunner to face while shooting. Machine Gunner and
Support Infantry classes use MG points
 *C4 TARGET* Use
the same procedure as with Tour Of Duty for placing these.You can use them on
walls or vehicles.In Day Of Defeat there called Satchels or Bomb.
 *WEAPON
TAGS* Place a waypoint while standing on bazooka
or sachel/bomb and a weapon tag will be automatically added.Bot will drop
weapon and pick up bazooka,or if its a sachel/bomb he will just pick it up.
|